以下内容总结自:
徐隆曦 - Java 并发编程 78 讲 - [10]线程协作
semaphore信号量
首先,semaphore信号量的作用是什么?
用于控制线程池的并发线程数量。
主要是通过控制permits,也就是"许可证"实现的,
首先,通过Semaphore构造函数,初始化permits = n。
然后,调用acquire()方法时,将一张许可证交给当前线程,
接着,当前线程陷入阻塞,当拿到许可证的线程数量等于n时,则开始执行,
并调用release()释放许可证。
来看个例子:
public class SemaphoreDemo {

    static Semaphore semaphore = new Semaphore(3);

    public static void main(String[] args) {

        Callable<Integer> task = () -> {
            semaphore.acquire();
            System.out.println(Thread.currentThread().getName() + " 拿到了许可证,花费2秒执行慢服务");
            Thread.sleep(2000);
            System.out.println("慢服务执行完毕," + Thread.currentThread().getName() + " 释放许可证");
            semaphore.release();
            return -1;
        };

        ExecutorService service = Executors.newFixedThreadPool(50);
        for (int i = 0; i < 6; i++){
            service.submit(task);
        }
        service.shutdown();
    }
}
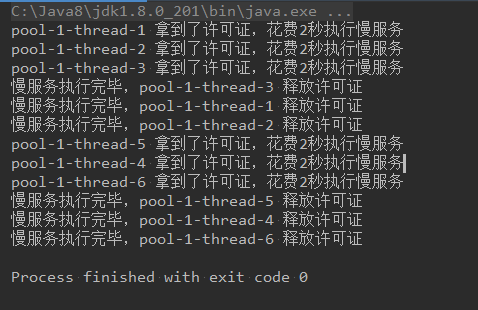
看下结果:

CountDownLatch
先来看下CountDownLatch的核心思想:
等到一个设置的数值到达后,才能开始执行。
举个例子,假设正在进行400米跑步比赛,一共有五名同学参赛,只有当他们都跑完,比赛才结束。
我们来实现一下:
public class CountDownLatchWaitTest {

    public static void main(String[] args) throws InterruptedException {

        ExecutorService service = Executors.newFixedThreadPool(5);
        CountDownLatch countDownLatch = new CountDownLatch(5);

        for (int i = 0; i < 5; i++){
            final int cur = i + 1;
            Runnable task = () -> {
                try {
                    Thread.sleep((long) (Math.random() * 5000));
                    System.out.println(cur + "号运动员已完成比赛");
                } catch (InterruptedException e) {
                    e.printStackTrace();
                } finally {
                    countDownLatch.countDown();
                }
            };
            service.submit(task);
        }
        System.out.println("等待5个运动员都跑完");
        System.out.println("-----------------------");
        countDownLatch.await(10, TimeUnit.SECONDS);
        System.out.println("比赛结束。");
        service.shutdown();
    }
}
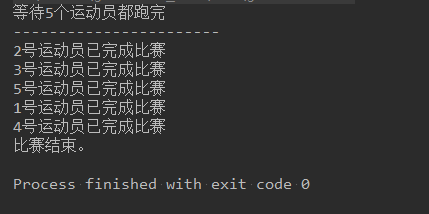
来看下结果:

CyclicBarrier
首先,CyclicBarrier有什么用?
它可以构建出一个集结点,当某一个线程执行await()方法时,
该线程就会到这个集结点开始等待,等待这个栅栏被撤销。
那么,这个栅栏什么时候被撤销?
直到预定数量的线程都到达这个集结点之后。
然后之前等待的线程就从此刻统一出发,去执行剩下的任务。
举个例子:
假设我们去公园玩,并且会租借三人自行车,并且从公园大门到自行车驿站需要一段时间,
我们来模拟一下这个场景:
public class CyclicBarrierDemo {

    public static void main(String[] args) {
        CyclicBarrier cyclicBarrier = new CyclicBarrier(3,
                () -> System.out.println("-----凑齐三人,出发!-----"));
        for (int i = 0; i < 6; i++){
            new Thread(new Task(i + 1, cyclicBarrier)).start();
        }
    }

    public static class Task implements Runnable{

        private int id;
        private CyclicBarrier cyclicBarrier;

        public Task(int id, CyclicBarrier cyclicBarrier) {
            this.id = id;
            this.cyclicBarrier = cyclicBarrier;
        }

        @Override
        public void run() {
            try {
                System.out.println("同学" + id + " 现在从大门出发,前往自行车驿站。");
                Thread.sleep((long) (Math.random() * 10000));
                System.out.println("同学" + id + " 到达自行车驿站,等待组队。");
                cyclicBarrier.await();
                System.out.println("同学" + id + " 开始骑车。");
            } catch (InterruptedException | BrokenBarrierException e) {
                e.printStackTrace();
            }
        }
    }
}
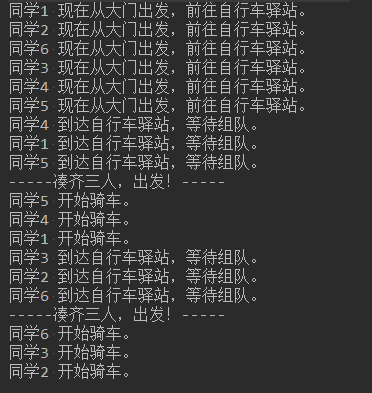
来看下结果:

我们来总结一下CountDownLatch与CyclicBarrier的区别是什么?
第一,减1的方式不同
CyclicBarrier是调用await()方法,而CountDownLatch是调用countDown()方法。
第二,可重用性不同
CyclicBarrier可以重复使用,而CountDownLatch只能使用一次。
第三,执行动作不同
CyclicBarrier有执行动作barrierAction,而CountDownLatch没有这个功能。
重温生产消费者模式
先来用Condition实现一下:
public class MyBQUsingCondition {

    private ArrayDeque<Object> queue;
    private int maxCapacity = 1 << 4;
    private ReentrantLock reentrantLock = new ReentrantLock();
    private Condition nonEmpty = reentrantLock.newCondition();
    private Condition nonFull  = reentrantLock.newCondition();

    public MyBQUsingCondition(int maxCapacity) {
        this.queue = new ArrayDeque<>();
        this.maxCapacity = maxCapacity;
    }

    public void put(Object o){
        reentrantLock.lock();
        try {
            while (queue.size() == maxCapacity){
                nonFull.await();
            }
            queue.offer(o);
            System.out.println(LocalDateTime.now() + " 生产者制造一件物品。");
            nonEmpty.signalAll();
        } catch (InterruptedException e) {
            e.printStackTrace();
        } finally {
            reentrantLock.unlock();
        }
    }

    public Object take(){
        reentrantLock.lock();
        try {
            while (queue.size() == 0){
                nonEmpty.await();
            }
            nonFull.signalAll();
            System.out.println(LocalDateTime.now() + " 消费者拿走一件物品。");
            return queue.poll();
        } catch (InterruptedException e) {
            e.printStackTrace();
        } finally {
            reentrantLock.unlock();
        }
        return null;
    }
}

public class ConsumerProducerDemo {

    public static void main(String[] args) {
        conditionTest();
    }

    private static void conditionTest() {

        MyBQUsingCondition myBlockingQueue = new MyBQUsingCondition(3);

        Callable<Integer> put = () -> {
            Thread.sleep((long) (Math.random() * 10000));
            myBlockingQueue.put(new Object());
            return -1;
        };

        Callable<Integer> take = () -> {
            Thread.sleep((long) (Math.random() * 100));
            myBlockingQueue.take();
            return -1;
        };

        ExecutorService service = Executors.newFixedThreadPool(8);
        for (int i = 0; i < 20; i++){
            if ((i & 1) == 1){
                service.submit(put);
            } else {
                service.submit(take);
            }
        }
        service.shutdown();
    }
}
你可以控制put()和take()方法内的睡眠时间,模拟多种场景。
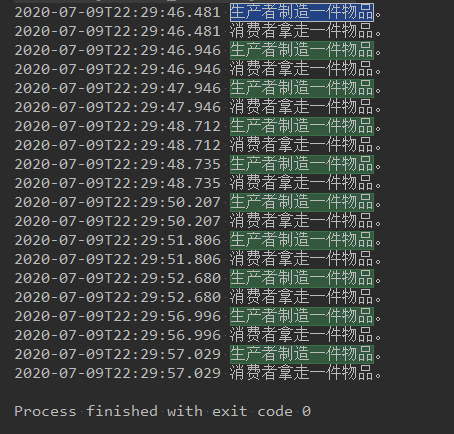
来看结果:

再来看下用object.wait()和notify()实现:
public class MyBQUsingWaitNotify {

    private int maxCapacity;
    private ArrayDeque<Object> queue;

    public MyBQUsingWaitNotify(int maxCapacity) {
        this.maxCapacity = maxCapacity;
        this.queue = new ArrayDeque<>();
    }

    public void put(Object o){
        synchronized (this){
            while (queue.size() == maxCapacity){
                try {
                    this.wait();
                } catch (InterruptedException e) {
                    e.printStackTrace();
                }
            }
            queue.offer(o);
            System.out.println(LocalDateTime.now() + " 生产者制造一件物品。");
            this.notifyAll();
        }
    }

    public Object take(){
        synchronized (this){
            while (queue.size() == 0){
                try {
                    this.wait();
                } catch (InterruptedException e) {
                    e.printStackTrace();
                }
            }
            Object ret = queue.poll();
            System.out.println(LocalDateTime.now() + " 消费者拿走一件物品。");
            this.notifyAll();
            return ret;
        }
    }
}

public class ConsumerProducerDemo {

    public static void main(String[] args) {
       waitNotifyTest();
    }

    private static void waitNotifyTest() {

        MyBQUsingWaitNotify myBlockingQueue = new MyBQUsingWaitNotify(3);

        Callable<Integer> put = () -> {
            Thread.sleep((long) (Math.random() * 10));
            myBlockingQueue.put(new Object());
            return -1;
        };

        Callable<Integer> take = () -> {
            Thread.sleep((long) (Math.random() * 10000));
            myBlockingQueue.take();
            return -1;
        };

        ExecutorService service = Executors.newFixedThreadPool(8);
        for (int i = 0; i < 20; i++){
            if ((i & 1) == 1){
                service.submit(put);
            } else {
                service.submit(take);
            }
        }
        service.shutdown();
    }
}
也来看下结果:


